Make summer drops with your own hands. How to sew capes with fields with your own hands: a form with a description.
A skin woman's wardrobe needs only one drop. Don’t say anything, but remove the head one from the fashion. Vin gives a unique charm to the image of a woman, add a touch of elegance and mystery. Before that, the woman’s droplet is not only a thinning accessory, but also a garnier of the head from a sleepy promenade.
In today's articles, we can see how to sew capelyukhs with fields. For this, the smallest detail is a drop at the kilkost, indications on the armchairs.
The armchair patterns of the details of the chapel of the vikonanі with allowances for seams 1 div.

1. Stachati bіchnі zrіzi poliv. Spread the seams and stitch them, laying rows on the line 3-5 mm from the seams (photo 1).
2. Fold the outer and inner fields with the front sides in the middle and grind their outer edges. Grind the seam up to 5-7 mm, turn the part on the front side, straighten the turning edge; add. Lay an obobny row at the edge along the golden edge of the fields.
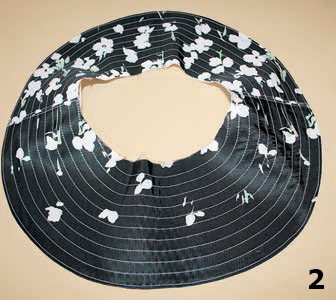
Lay parallel rows across the fields on a 1 cm stand, one in one (photo 2).
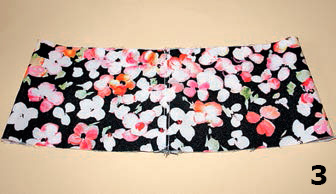
3. Stitch the back view of the crown; stitching seam (photo 3). On the underside of the thulle, grind the back slit, leaving a gap of 5-7 cm for the viper trap.
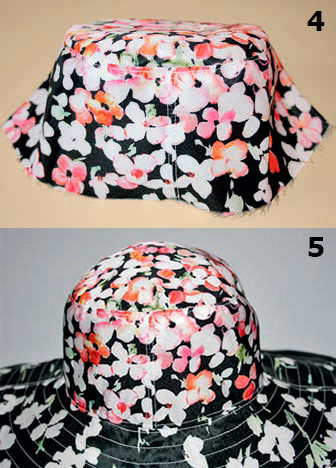
4. Grind the bottom to the waist, the lining of the bottom to the lining of the waist. Ask for seams on the thulium / lining of the thulle and sew on the 3-5 mm gap (photo 4).
Fold the prepared parts with the front sides in the middle, put the margins between them, cut each other and close all the balls in a straight machine row.
Turn the droplets through the open opening at the lining of the thulium. Pull the allowances to the opening in the lining of the tuli in the middle and close it manually with hidden stitches.
Adjust the seam for sharpening the watering on the opening 3-5 mm from the seam (photo 5).
We think that it will be rich to know how to sew capelyuh with your own hands, which will become an indispensable headdress for the hot summer season.
We offer you a cape, which Teresa Bahler sewed, vicory claps of fabric.
Let us prepare the necessary materials and tools.
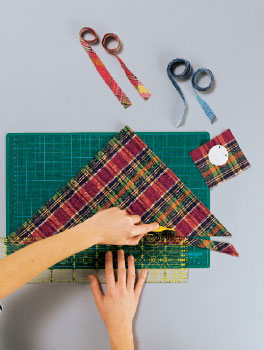
Obov'yazkovo need a mannequin, for which there is a large part of the robot. Also, prepare the clapboards of the most fashionable fabrics with the “cleat” print, non-woven fabric, roller bottom, special support for cutting, line, dry and other sewing attributes.
It’s like you don’t need such a droplet with fields, the one who will be made up of impersonal dry men, like they will be put on a mannequin.
For the cob of all klaptiki, you can use it for additional interlining, after which you can thread the fabric on the necessary braids. For which one do you need a roller lower. Virіzati slid obov'yazkovo along the slanting, the width of the collar becomes two centimeters. Dodatkovo slid a mug for the center of the droplet, five centimeters in diameter.
On the mannequin in the center, the whole mug is pinned. After a few steps, step by step, we need to pinch the knots of the fabric, so we go one by one. Smuzhki are imposed until that hour, the docks are viide about twenty centimeters in diameter.
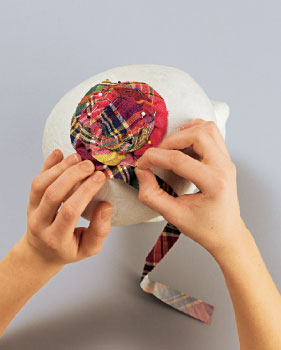
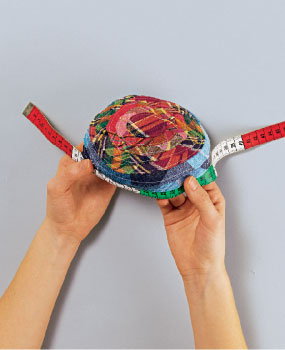
It is necessary to take the old edge of the droplet with great stitches to the size of the girth of the head.
The most modern head cleaning 2014-2015
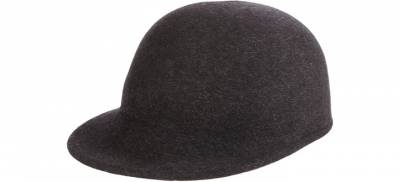
Kepi - Eugenia Kim, 11 075 rubles. / $245
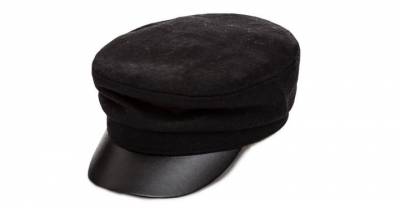
Kepi - OVS, 319 rubles. / $10
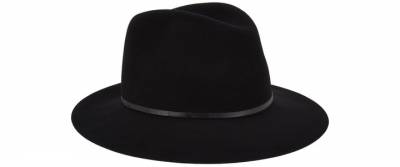
Kapelyuh-Fedora - Janessa Leone, 8690 rubles. / $215
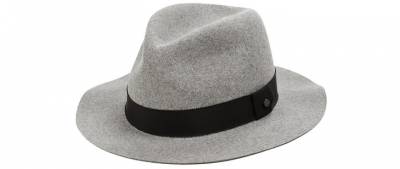
Kapelyukh-Fedora - Rag & Bone, 7885 rubles. / $195
HEAD COVERS
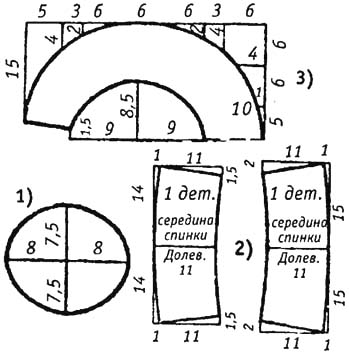
Details:
1. denze - 1 detail;
2. Tullya - 2 details;
3. Neighborhood - 1 detail.
Robot:
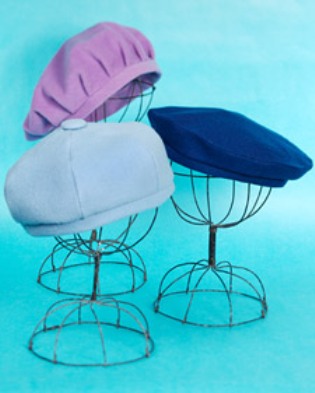
Scrape your hand between bіy bіchnі sides of the details of the walls with a seam of 0.7 cm. After that, grind off the walls from the day. Ask for a seam at the back wall, stitch to the edge or ask. Process the lining in the same way. Fold the details of the main and lining fabric with the inverted sides in the middle, bending the lower slits. Sew off the edges of the side of the ring (wine will be taken at the same shape of the ring), sew the seam. Attach the border to the lower edge of the beret, clasping it with the front side with the lining. Turn around the beret on the front side of the beret and lash it on the wall, curling the stitching seam. Yakshcho vykonuetsya zі shkіri, yogo internal bill sprout from the main fabric (hide the detail behind the shape of the rim of the skirt and stitch it to the bottom along the hem, putting the right sides in the middle). Widparte carefully takes and attaches the details.
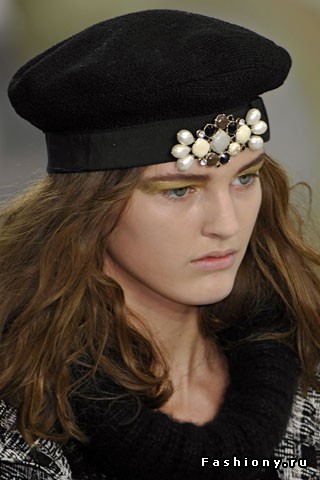
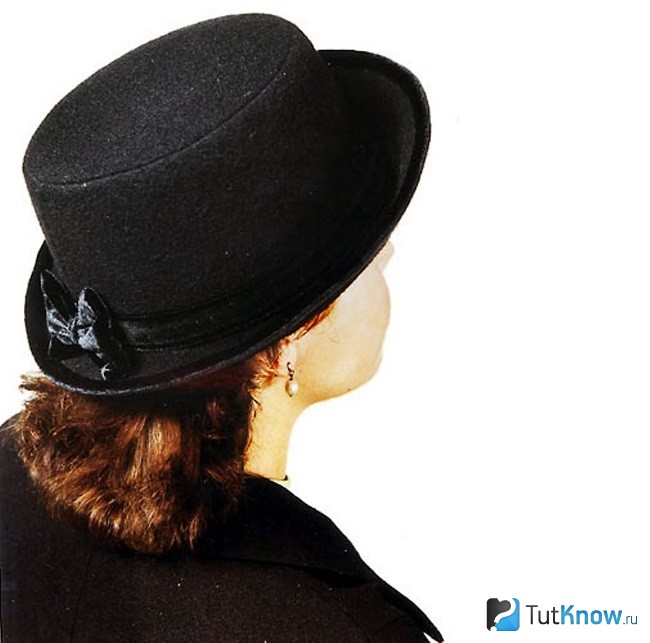
Take from black oxamite with a bow, fastened with a brooch. This one is recommended to be sewn from soft pile fabrics that are well draped - oxamite, a fluffy drape. The bow is from a rep stitch in a contrasting color. Decorative function vikonuє i okolitsya zі shkіri. The lining is the most robust with a thin lining or a veil-type fabric.
Details:
1. denze - 1 detail;
2. Tullya - 2 details;
3. Neighborhood - 2 details;
4. Bow - 1 detail.
Robot:
Stitch the shoulder between you and the sides of the details of the walls with a seam of 0.7 cm. After that, grind off the walls from the day. Ask for a seam at the back wall, stitch to the edge or ask. Process the lining in the same way. Fold the details of the main and lining fabric with the inverted sides in the middle, bending the lower slits. Sew off the edges of the side of the ring (wine will be taken at the same shape of the ring), sew the seam. Attach the border to the lower edge of the beret, clasping it with the front side with the lining. Turn around the beret on the front side of the beret and lash it on the wall, curling the stitching seam. As if around the outskirts of the skirts, yogo the inner side should be made from the main fabric (hide the detail behind the shape of the outskirts of the guardrails and sharpen to the new one along the bottom of the botsi, putting the right sides in the middle). Widparte carefully takes and attaches the details. An inimitable embellishment is a great decorative bow, which can be made from a scarlet drape and velor. According to the line of the middle, marked on the wicker, tighten the detail of the bow with a thread, or lay the neckline with soft folds and attach the brooch to the beret. Oskelki bows are recommended to be made from fabrics that do not sag, it is not necessary to trim the edge. Surroundings vykonuєtsya zі piece shkіri.
Details:
1. denze - 1 detail;
2. Tullya - 2 details;
3. Neighborhood - 1 detail.
Robot:
Stitch the shoulder between you and the sides of the details of the walls with a seam of 0.7 cm. After that, grind off the walls from the day. Ask for a seam at the back wall, stitch to the edge or ask. Process the lining in the same way. Fold the details of the main and lining fabric with the inverted sides in the middle, bending the lower slits. Sew off the edges of the side of the ring (wine will be taken at the same shape of the ring), sew the seam. Attach the border to the lower edge of the beret, clasping it with the front side with the lining. Turn around the beret on the front side of the beret and lash it on the wall, curling the stitching seam. As if around the outskirts of the skirts, yogo the inner side should be made from the main fabric (hide the detail behind the shape of the outskirts of the guardrails and sharpen to the new one along the bottom of the botsi, putting the right sides in the middle). Widparte carefully takes and attaches the details. Take a hard form of wickons from a drape, dubbed with two balls of glue pad. The gasket is needed in order to clearly fix the conical shape of the beret. The adhesive padding can be replaced with a large rib, and in the same way, the details of the fabric should be carefully laid with the rib with oblique stitches along the stake so that the stitches from the front side are not visible. The thread cannot be tightened when stіbtsі. The seam on the densi of the beret is close to the decorative detail from the drape of the shkir. Surroundings are wrapped around the main fabric. Lining - zvichayna.

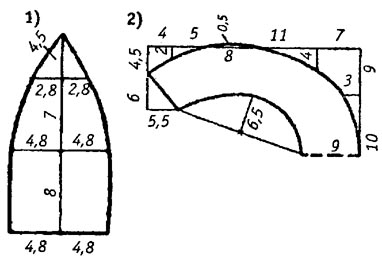
Details:
1. Wedge - 6 parts;
2. Visor - 2 details;
3. Neighborhood - 2 details.
Robot:
1) Zrobivshi form from paper, applied to the fabric.
2) Stochuєmo wedges on vivoritny barrel.
3).
The visor is twisted behind the outer contour and has a line on the 0.75 cm. Sew around to the waist.
Details:
1. Middle part - 2 parts;
2. Bichna detail - 2 details;
3. Visor - 2 details.
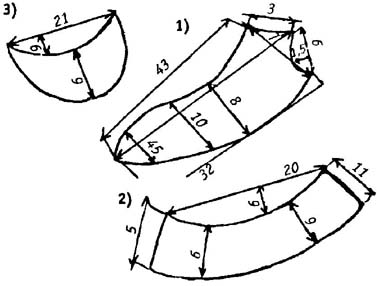
Robot:
We work the form on paper, transfer it to the fabric, weave and sew on the back of the two middle details, and then the two side ones. Z'єdnuєmo їх mіzh yourself. Pidkladkovu robimo for tієyu w form, scho і for the main details. Zshivaemo pіdkladkovu and sewn її to the cap. Then we sew two details of the visor and sew it on to the cap. The visor is sealed with cardboard or with a plastic gasket. The lower edge of the cap is covered with a rep stitch.

Details:
1. denze - 1 detail;
2. Fields - 1 detail;
3. Bіchna chastina tulі zі zginom - 1 detail.
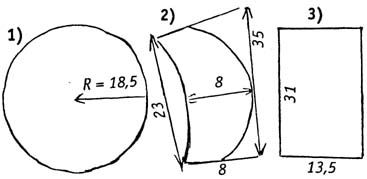
Robot:
Close all details at the top with a slotted adhesive pad. Grind the details of the wall, ask the seams uphill. Sharpen the bottom to the top of the wall, stitch the lining and sew to the edge. Details of the lining on the top, back details of the wall. Fields, folded with the front side to the front side, stitch.
Details:
1. denze - 1 detail;
2. Tullya - 2 details;
3. Fields - 2 details.
Robot:
All details on the lining made of thin fabric. Wistrochit the laying of the watering. Work the lining along the same vikriykah, and with the oblique roztashuvannyam of the share thread. On the back, the details of the waist are sewn, then they are sewn on until the day. Sew the fields to the finished head.
Details:
1. Wedge - used parts;
2. Fields - 2 details.
Robot:
Vikriyka sprout on paper, transfer to fabric. Sew a wedge on the back. From the lining fabric, sprout a rib on the same ribs and sew to the waist of the droplet. Ale, first sew the fields. Wistrochit the fields and the gasket. Fields can be lifted both in front and in the back.
The material was stored behind the book by L. Stoykova "Headgear. We knit. We knit" and it was given by Galina Doshchova (Lina)
______________________________________________________
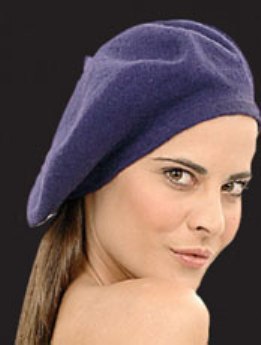
bereti like earlier in fashion, especially like this, you don’t take more for anyone. It is possible, if you take sewing yourself.
How to take it? Tse is not complicated that shvidko. Navіt yakscho your dosvіd shitya school lessons pracі, then the end result is less likely to fall due to your bazhannya and diligence. 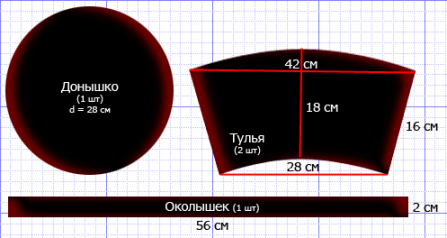
We choose the material that we have been worthy of for the beret. Tse mozhe buti drape, oxamite, fleece, smart. I will pronounce vikroyka for beret from soft material on the head with a diameter of 56 cm. You can fantasize about it, work yoga zі shkіri chi khutra.
Otzhe, report instruction, how to sew a bere. (Don't forget to cut the stitches after skin surgery.)
- We transfer the form to the fabric, adding seam allowances of about 1 div.
- Cutting the fabric.
- We begin to grind out the details of the waist, and remember the seams.
- Attached to the waist of the beret, and seams.
- Mustache 4 points repeat for lining.
- Folding the front and lining parts is taken with twists in the middle and carefully stitched.
- We were left with cunningly sewn around. Be respectful! It’s better to see it once again, and then add it back to the bottom of the body, turning the lining of the beret with the front side. Then turn around the borders with the names of the names, to the torso - with a twist, and stitch along the upper edge with a front row.
Salty, tobto embellish take to relish!
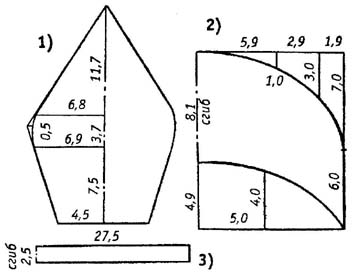
Kapelyuh is a necessary summer accessory. And you can wear drops not only for a repair, but in the city. Tim is bigger, that the summer sun is scorching mercilessly. Today, we show a simple technique for preparing a summer droplet. Zalezhno v_d fabric and decor can be a country, beach or m_sky variant. The form is ready and the description is ready to allow you to sew a fashionable accessory quickly and to your satisfaction. You need a trio of free time, a side of fabric, and an ashlar decor.
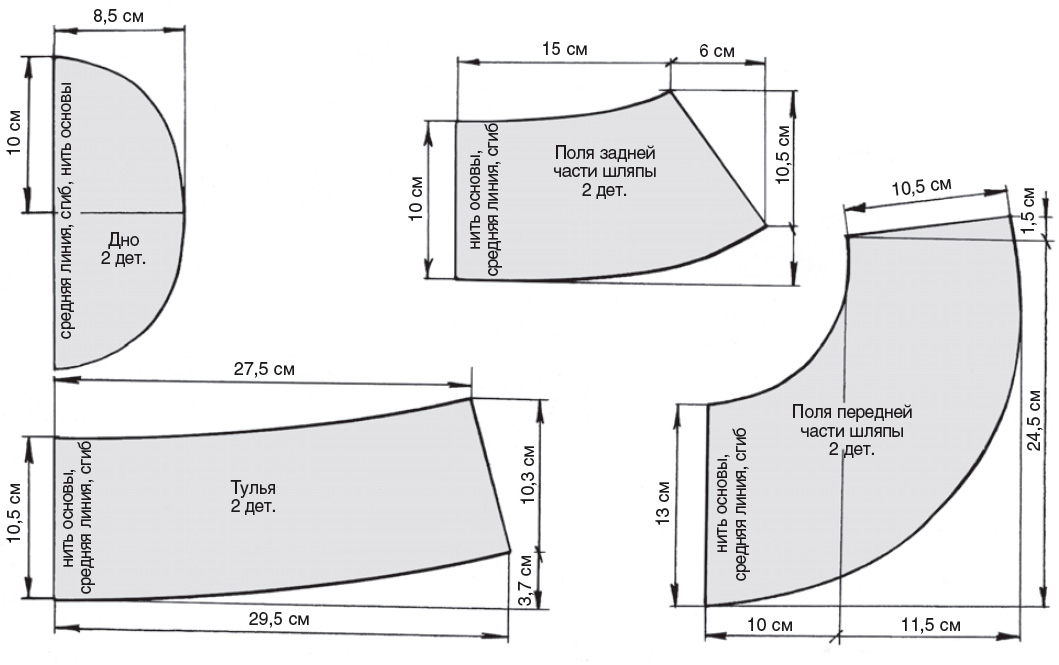
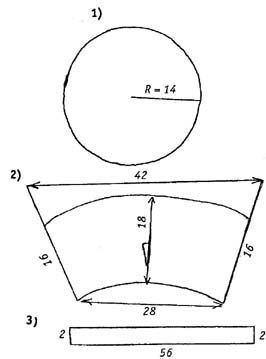
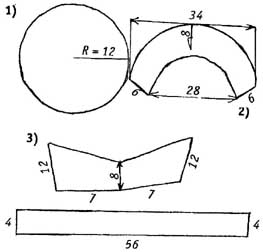
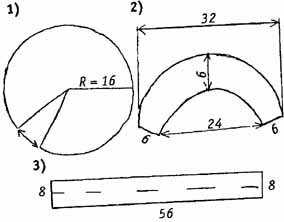
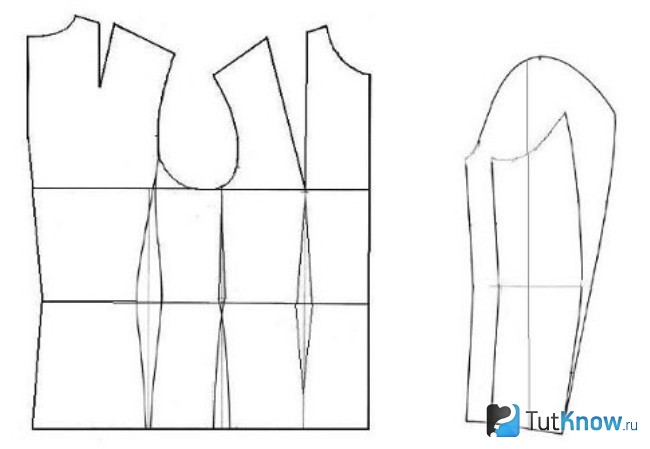
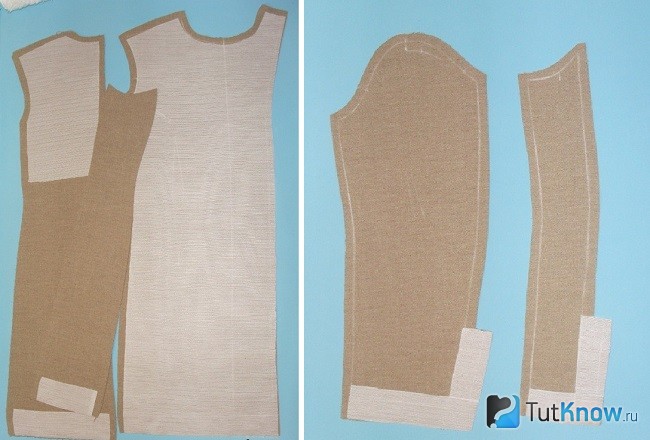
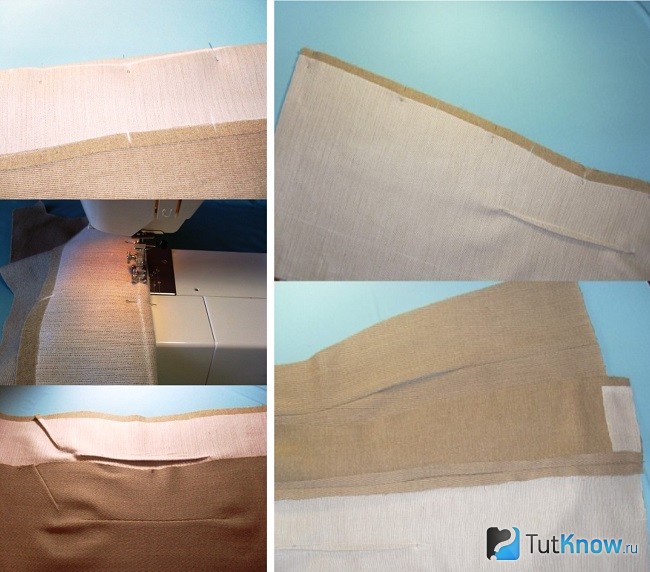
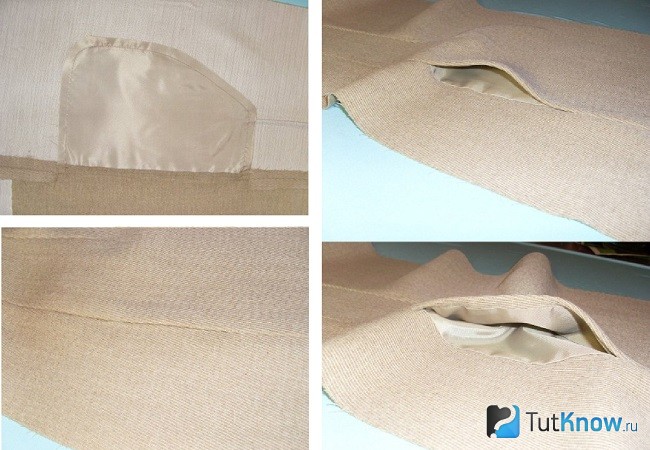
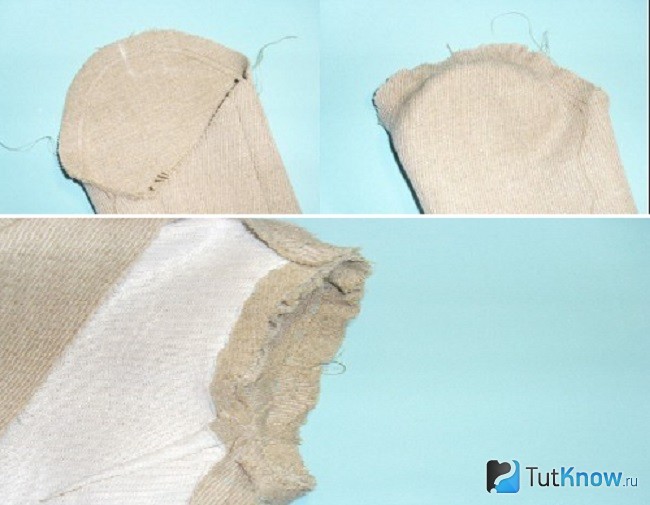
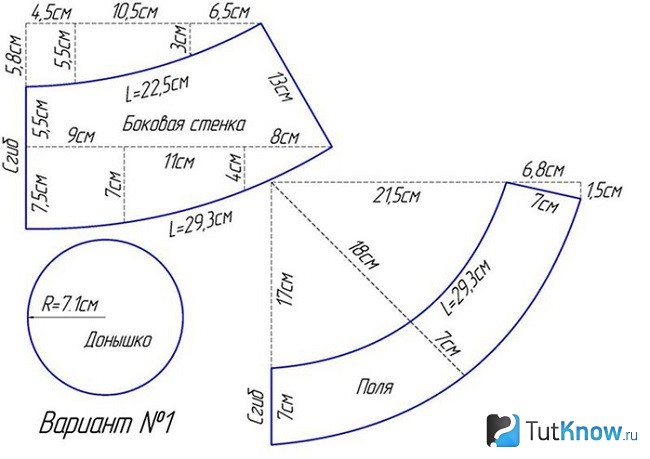
At our master classes, we already told about those how to sew and knit hats and berets. And today's mova pide about summer drops. This accessory is simply indispensable for a head-scratcher in the sun in summertime. Kapelyuh mi shitimemo from light bavovnyanoy fabric. But you can fantasize. For example, rob the top of the capelyukha from the grid of chi chimney. All the details of the hanging droplets. Therefore, you will need to look at the skin element in the root copy. Rosemary representations for my head. Try to win and try to fight. Vykhodyachi z tsgogo, zrobіt form vyklyuchno pіd yourself. Know the world from the stake of the head. Submit this number. Tse will drink. My version has a size of 29.3 cm. If your figure is in the smaller direction, then take a few centimeters from the side of the cut. And if you have a larger size, then add centimeters. І do not forget to increase or change the radius of the droplet drop. In the diagram below, you can see a bachite: a rectangle is a whole droplet, a ring is the bottom of your droplet and the third detail is a droplet field. For the cob, try the form on paper. Let's cut the paper wicks and put them on the fabric. Weave fold navpill, so that you have two mirror details. Skolіt form with fabric and cut. Shards of droplets will be two-sided, then the future can be bigger, then. 4 bіchnі walls, 4 fields that two days. Cut out all blanks. Sew in pairs sidewalls and fields. Iron the seams. Let's sew the side wall until the day. After I prepare it, sew it on before watering. Sew on a stake on a sewing machine. You have two identical preparations. Now we need to eat them. For this warehouse, the fields of blanks are folded with the front sides and sewn along the stake. With this in the end of the seam, we will not sew the seam 5-7 cm. Now the smut beautifully grinds the edge of the droplet. Take a needle and thread and mark the edges with a great stitch. The seam, which you have removed in order to turn the droplets, carefully turn the middle and throw it. So that the fields of the droplet were larger, it is necessary to grow a line along the entire perimeter of the fields. The first row is very close to the edge. The next row is stitched on the 1st line, see the first row, and so the whole field of the droplet is seen. At the end, ask a drop of praskoy. Your new wardrobe accessory is ready!
It is suggested to perekonatisya, that it is not easy to sew a coat with your own hands. The articles have simple models, for which no form is needed.
How to make a warm poncho with your own hands?
To shine in a fashionable outfit, not obov'yazkovo to be in shape according to the figure, sharply sharpen, reshape the sleeves. Sew a coat on a kshtalt poncho - guiding variant for pochatkіvtsіv.
![]()
To create this, you need a minimum of deaths:
- spread your arms at different sides, stand up from the elbow of one to the elbow of the other (A);
- put an ear of a centimeter stitch on the shoulder, omit її, designate a bagan dozhina (B).
- On newspapers glued together, or on a millimeter paper, calcium, place a rectangle on the sides of AB. At the center of the tsієї linії designate an oval for the shiї, ale vin is guilty of but trochs larger for it.
- Cross the oval straight down - the whole bar is in front, here the zashta will be stitched.
- Stitch the sidewalls, filling in an unsewn opening for the hands.
- Write 2 lines with a width of 3 cm. Attach them right-handed and left-handed on the line to the smell. In order to make a cut of the coat in front, I first fold a small stitch along the line of the strap with the front sides, stitch, request a seam. To twist a line, to turn on the slats, to stitch.
- Move down the robe. Attach square guts. For this, cut a straight cut from fabric, turn it over to the animal, sew a seam. Let's rot the intestines from three sides by 7 mm. Scribble on the mist.
- It was no longer possible to sew on gudziks, patch loops, sew on fribs, sew on seams and reconcile coats, sewing with your own hands seemed so easy.
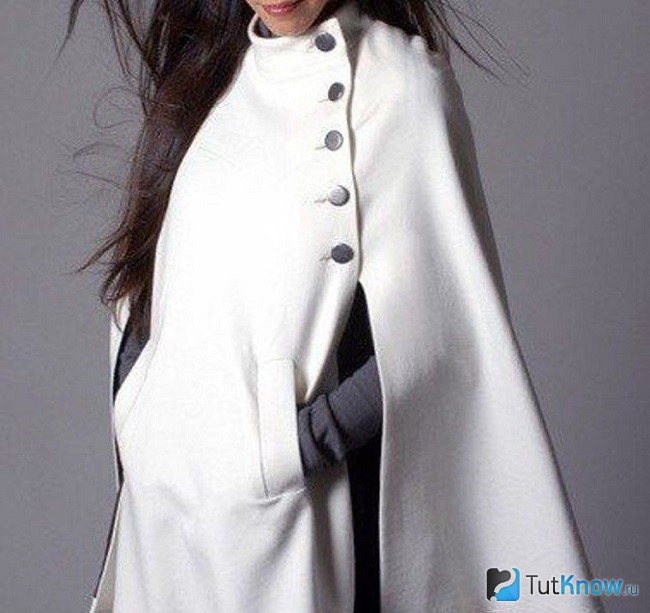
In this case, the intestines become clear. If you want to sew the same coat without a coat on a kshtalt poncho, you can create a straight-cut shape of a colo. In your current day, you will see such a new thing.
![]()
On the same basis, you can sew a coat with your own hands with comir. It's easy to fight out.
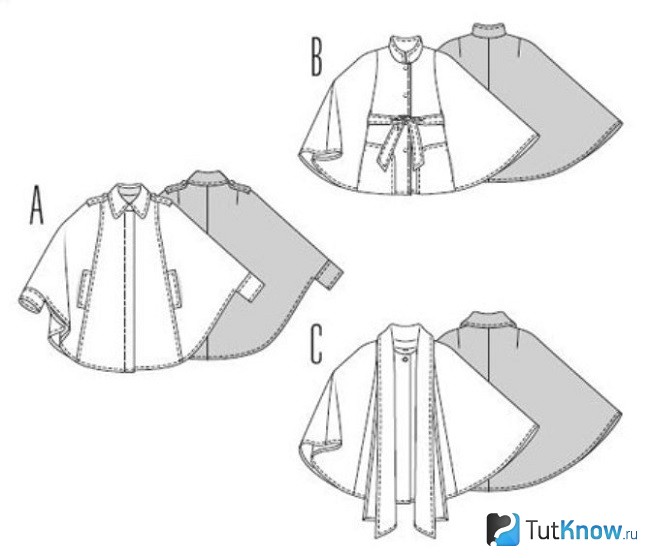
Look at the "C" model.
- For such a fabric, it is necessary to cut a wide stitch and trim the edges, turning and stitching them.
- Pull the middle and the center of the neckline on the back. Overturn the line vzdovzh navpil, sew it to the coat on the commissary so that the veins leaned between the two halves of the line.
- You can add її to both of the podlog before, or leave it here freely, so that we can tie it beautifully.
- On fig. "A" can be seen, yak vіdstrochiti sleeves. So that they don’t blow cold wind, sew cuffs on tієї and fabrics or knitwear.
- Figure "B" shows where there are 2 slits on the waistline from the sides, to put a belt here, tie yoga at the waist.
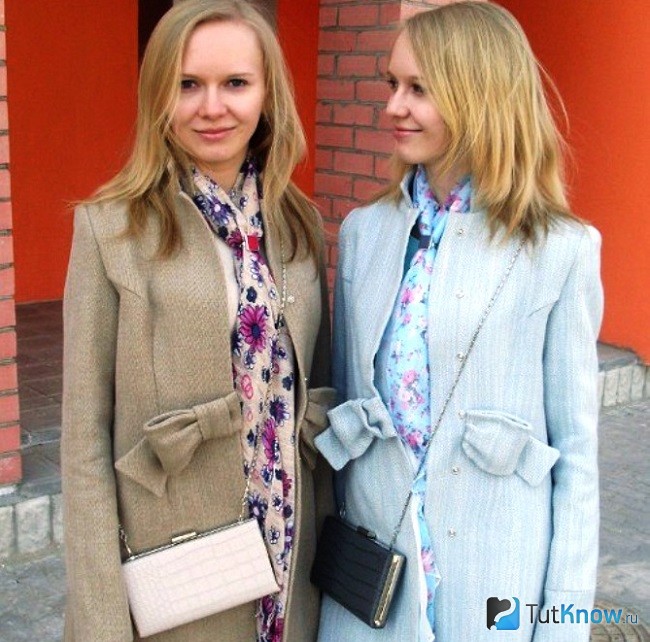
How to sew a coat - is it more stylish?
The axis looks so out of place.
For which you need a coat shape. Like you can design, create yourself. If not, you can rewrite the form from the magazine or go to the atelier. They give such services cheaply. In this way you take away the pattern, created by yourself for your figure. You will need it if you have a raincoat, a jacket, or some other garment. You can ruin an old jacket and make a coat on a yoga basis.
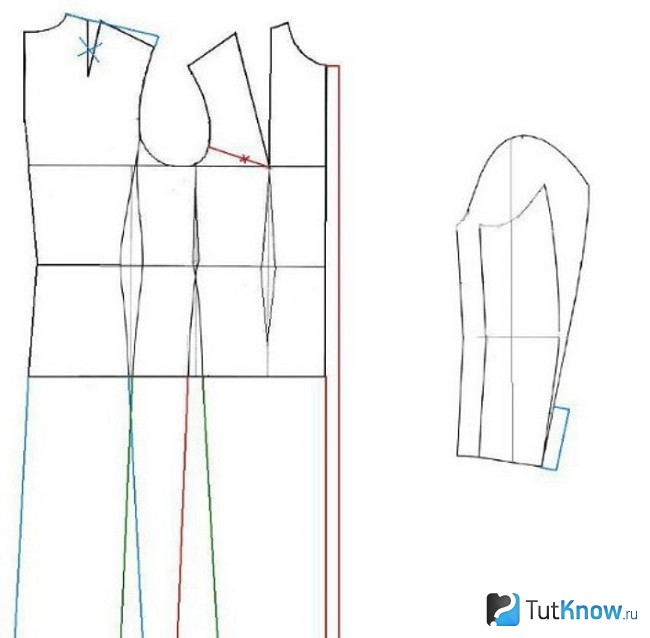
On the stepping baby, the color lines show how it is necessary to change the shape.
- Pull up the floor and back.
- Take twisted on the back.
- On the police, navpak, zrobіt vytochennya. Go ahead and open it up to the middle of your breasts.
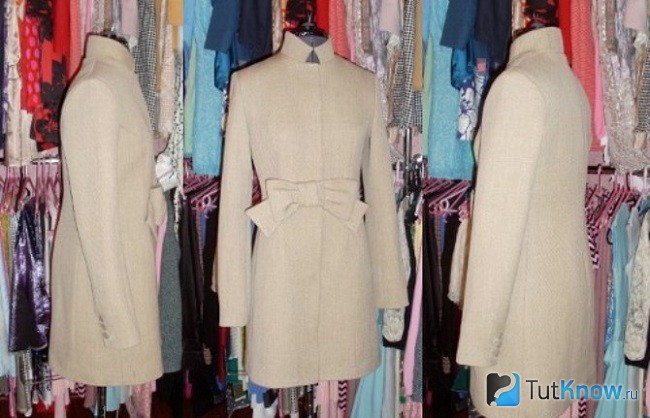
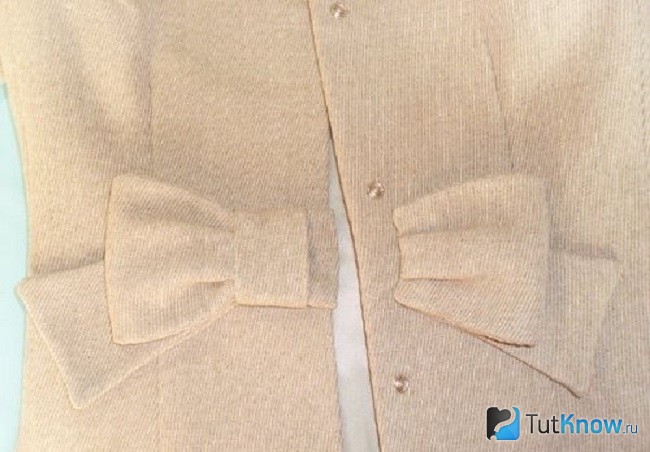
- We add a coat with a comir-style coat and a bow.
What do you need to sew such an outer garment:
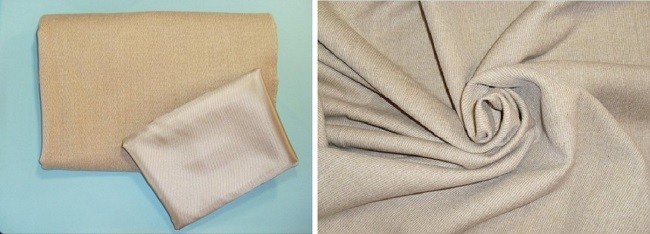
- fabric for a coat - thin wool 1.8 meters;
- lining - 1.6 m;
- adhesive dublerin;
- threads at the tone;
- scissors;
- kreyda abo dry pardon.
![]()
Before that, how to sew a coat, let the fabric, give it to the payoff. So ready to sit viribly, it’s ideal to wake up after the early morning, prasuvannya.
Put the details of the vikryka on the fabric, christen them, recognizing the twist. Virіzhte, adding allowances for seams:
- on sight - 1.5 cm;
- for the neck - 1 cm;
- on pidgin sleeves - 3 cm;
- to turn the bottom - 4 cm.
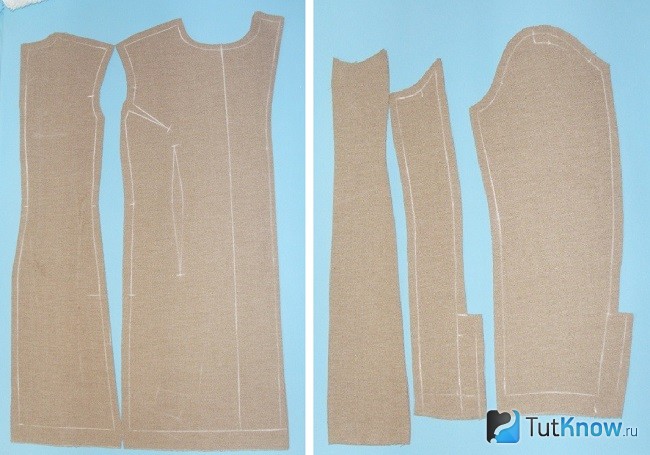
From the lining, add the same details, like from the main fabric, but on the floor without a trim and it is not necessary to turn the neckline facing for the back from it. At the middle of the back fill in a fold, the width is 3 cm. Do not forget about the seam allowances - 1.5 cm.
From the adhesive dublerin, laying out the details on the payoff, shirring them without allowances for the seams. The axis of the details you will have from this material:
- turning the neck of the back;
- polychka with pidboards;
- shoulder part of the back;
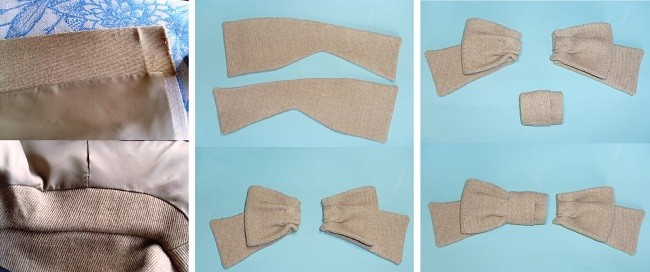
- bow - 2 details;
- comir - 2 details.
After that, as you have worked out the details, it’s time to sew a coat.
1. Sew up the coils, like stitches on the waist and breasts. Ask them, apparently, to the center and uphill.
2. Fold the side part out of the front, stitch them all at once, filling the opening for the intestines.
3. To make the gut grow, grind two details. Fold the slit with the sides of the cut on the main fabric, sew the fabric with the right sides, stitch on the fold.
4. So that no transparent guts are visible, put the main fabric on them, sprout it upside down along a small horizontal row.
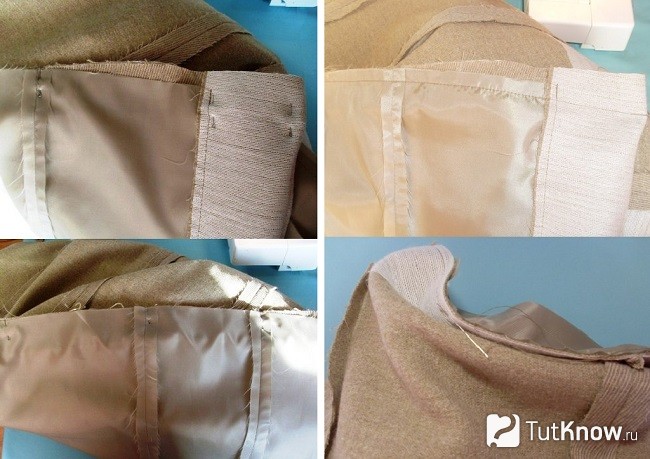
14. Sob the sleeves sat well, gathered up the skin on the mountains. Put in double armholes, pull down the front sides of these folds, stitch on the fold.
15. Sew the sleeves from the lining to it just like that. If you like a coat with frills, sew it on the collar at this stage. You can buy and sew with your own hands.
16. Attach the lining to the piping, the neck of the coat.
17. If you have a tool for fastening buttons on the canvas, making a fastener from them. Yakshcho nі, pіdіdі go gudziki.
19. Sew the middle to the right part of the bow with a hidden seam.
20. Wyvernit coat. At the bottom of the front and back, chip off the lining and the backboards. Pidshivaemo secret stibkom.
21. Wrap the rib through the open seam on the sleeve, sew up the yogo, add on the bottom.
22. Designate a place for three loops on the sleeves, overcast on the machine, sew on the tails.
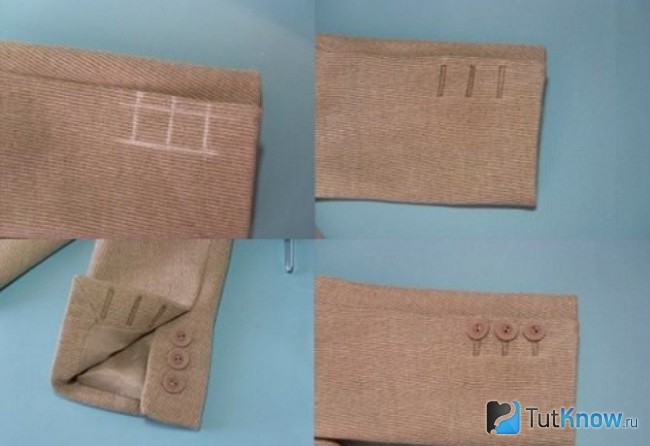
The work is finished. Such a coat is sewn for the sake of perseverance at that hour. Then you will spare for the purchase of clothes, pieces of fabric for clothes are cheaper, lower ready-to-wear. If you want to be amazed, if you want to sew a coat, then open a video player in the country. In the meantime, add a stylish droplet to the autumn set, which you can create from excess fabric.
Do-it-yourself capsules for fashionistas
Axis like this, you can booty.
Rozpovіdayuchi about those, how to sew capelyuh, it is necessary to zupinitsya on vikroytsі. It's easy to indulge її, spiraling on the photo.
Yak vie bachite, it adds up to:
- denze;
- sidewalls;
- watering
Shchob kapelyuh trimav shape, vikryte yogo іz schіlnoї fabric. As if you are sewing from a thin one, attach a glued edge to it, then hide yoga behind a lining.
In the rest of the fall, as a lining, the main fabric can act.
- Sew up the sidewall, joining the edges. Eat the upper part of the day, putting these details to the faces one by one. Sew.
- Vikriyte 2 details of watering (skin from rot). Insert between them the bottom of the sidewalls, sew.
- You can sew a small veil on the front and create a more mysterious image. On such headdresses, kvіti from fabrics, brooches miraculously look.
For such it is necessary to have 4 details of a day, to grind them. At the bottom, a sidewall is attached to them. Marvel at how the drops are sewn with your own hands.
First video, about those how to sew a coat with your own hands Shvidko.