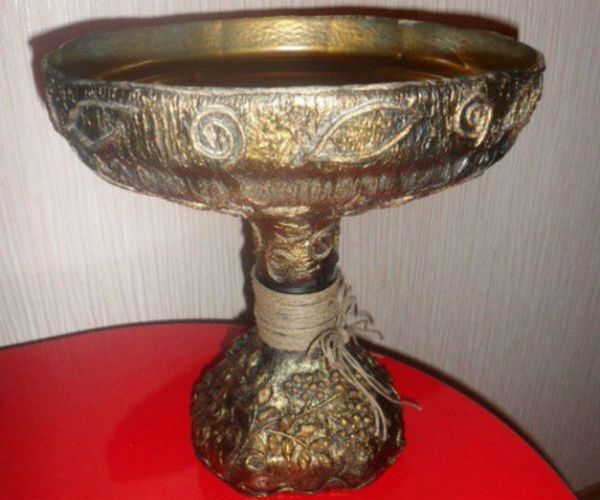
Make a vase from a glass jar with your own hands.
Behind the kerm From unnecessary plastic dances Just like in everyone’s everyday life, you can create various masterpieces with your own hands. So you won’t be able to get away with special skills, you’ll spend an hour and a penny. So unexpected vases
fits wonderfully into a cozy home interior, complements the design


Christmas table
- And now act as an exclusive gift.
- To your respects, 5 intelligent lessons.
- For fruits
- Required material:
- 20-liter plastic water tank;
- 6-liter plastic water tank;
- PVA glue;
- penzlik;
- kitchen sponge;
- knives;
- toilet paper;
spool of twine;
- spray farba gold;
- spray farba black color;
- glue for plastic.
- Creation order:
- Cut off the necks of the necks, removing the remaining parts from their bodies.
- The large bowl will be the top part of the vase, and the smaller part will be the bottom.
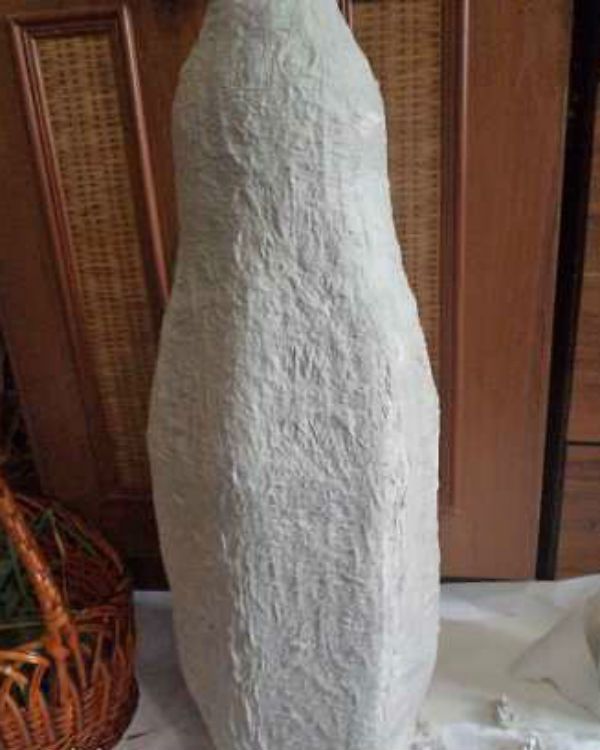
- Glue the outer part of the cut pieces using toilet paper and PVA glue using the papa-mâché technique.
Let the paper balls dry.


Christmas table
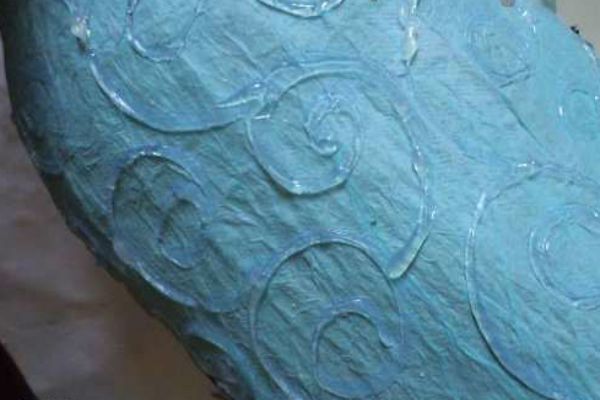
- Use a piece of toilet paper or a roll of twine to create a vase molding on the details of the vase.
- 6-liter plastic water tank;
- toilet paper;
spool of twine;
- Allow the glued elements to dry on the surface.
- Apply black powder to the stucco, then gold.
- Apply foam to all unprepared parts.
- Add relief to the texture using a kitchen sponge.
Bring together the offending parts of the vase.


Christmas table
- Decorate the vase with a stitch or twine.
- The parts of the vase need to be firmly glued together with plastic glue.
- For clients
spool of twine;
- plastic bowl of prozor with a volume of 1.5 liters;
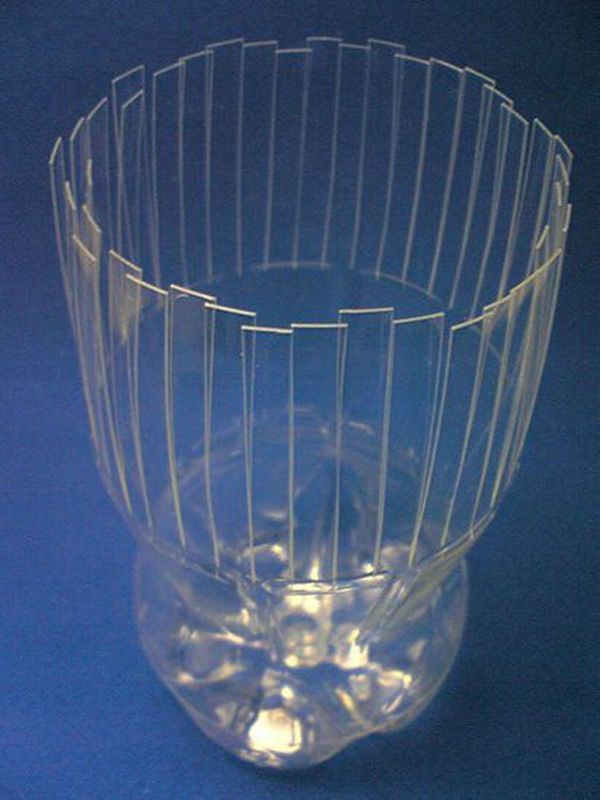
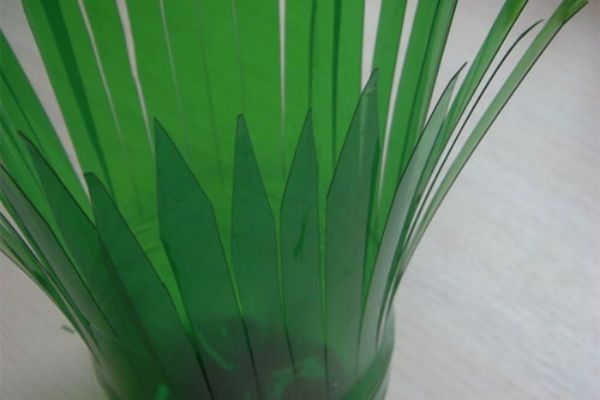
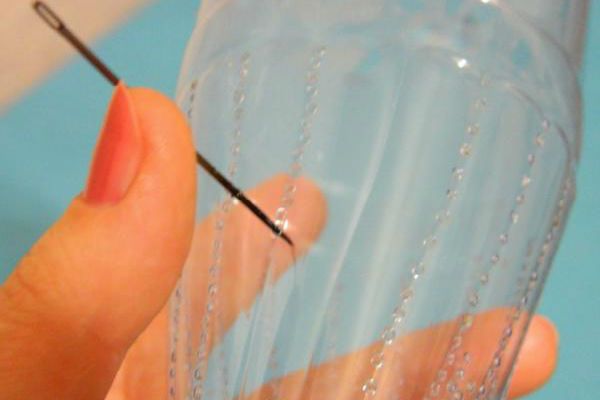
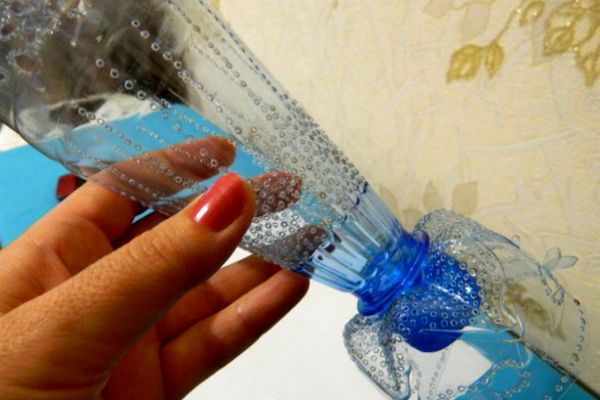
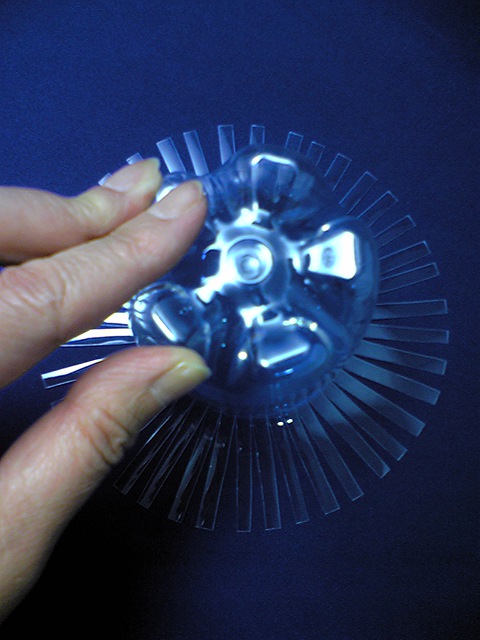
- Cut the neck of the dance in such a manner that the entire cylindrical part of the dance is lost.
- Make vertical cuts about 8 centimeters in the wedge.
- The cut-outs may be a little more than 0.5 centimeters wide.
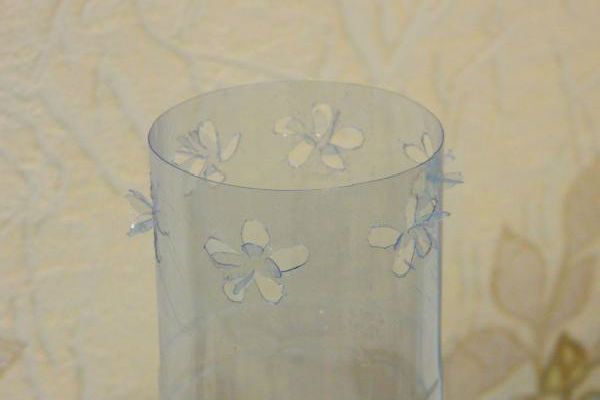
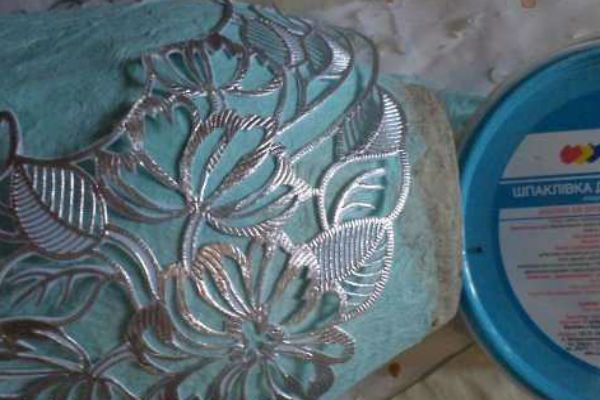
- By applying a heater to the vase tree in the decoration, apply all the prepared flowers.
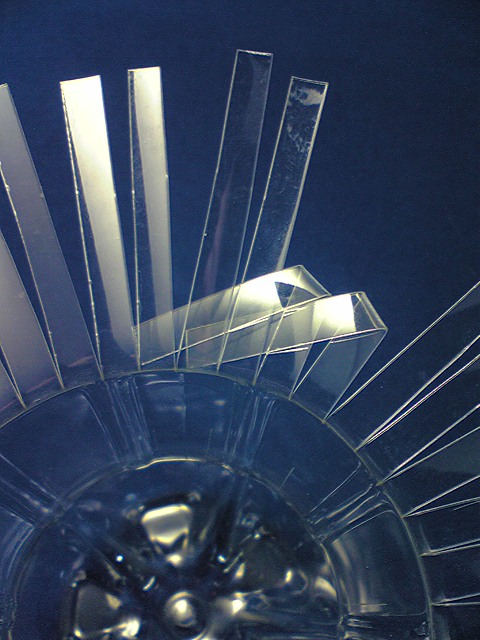
Openwork


Christmas table
- 2 plastic bowls with a volume of 0.5 liters;
- candle;
- Sirniki or igniter;
- the tsigan's head is great;
- For clients
spool of twine;
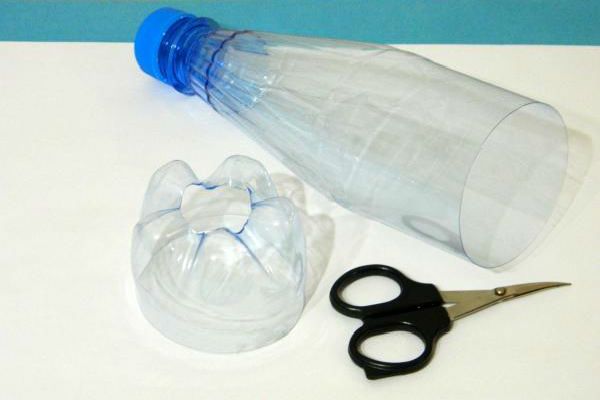
- At the bottom of the first bowl, you need to make an opening with the diameter of the lid.
- Cut the bottom of the dance.
- Place the neck of the dance into the cut hole and screw it with a cork.
- The basis of the wazi came out.
- You can try to install it.
- Even though the vase is not worth it, due to the damage it is uneven.
- The vase can be deprived of either small flowers or dryness.
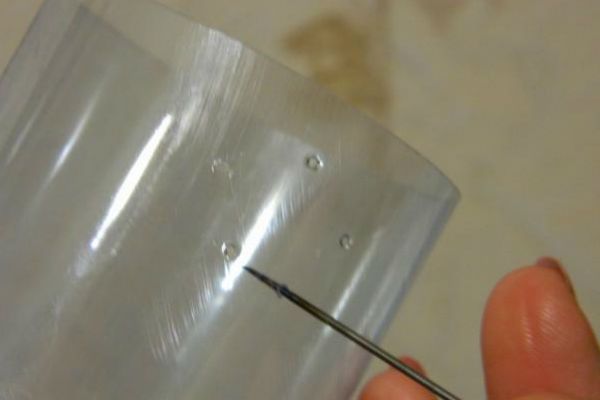
- It is necessary to make the vase openwork.
- Light the candle and fry the head over it.
- With a hot tip, pick out specks on the dance floor, from which you can see the flowers.
Create openwork patterns with speckles.


Christmas table
- For fruits
- PVA glue;
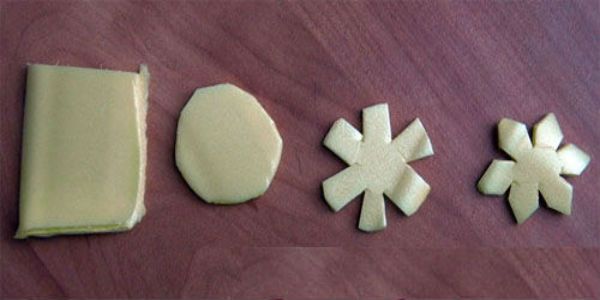
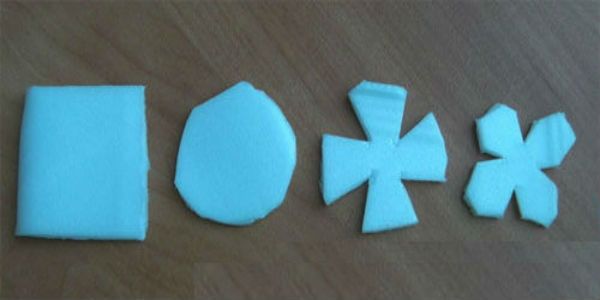
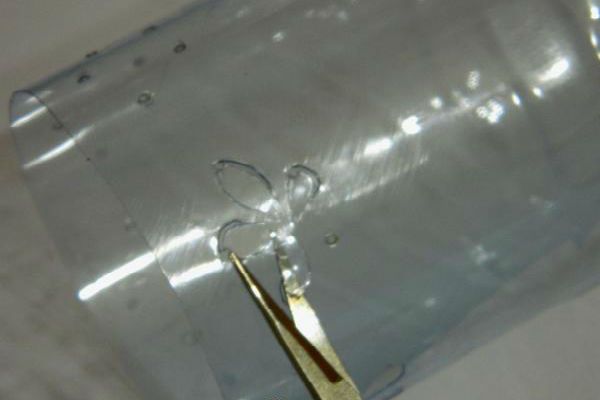
- Do not cut through the petals until the end.
- Give the flowers some openwork by bending the pellets onto the outer side of the vase.
- To earn this way you will need a number of rows from tickets.
- Decorate the entire vase with hot, bare dots.
- Decorate the vase stand.
- Take the vase.
- Put a check.
- Pidlogova
- servets;
spool of twine;
- plastic bowls (milk and kefir) with a volume of 1 liter;
- bottle of a jar with a volume of 3 liters;
- farb of required color;
- decorative flowers;
- glue gun;
- vibita servetka;
- putty;
- scotch.
- Squeeze dances with tape.
- One pair is creaked with necks, 6 pairs are creaked with dens.
Tape the dances together with tape at once.
Place a glass jar on top of the structure.
Cover the structure thoroughly with toilet paper, servettes and undiluted PVA glue.
Visushiti.
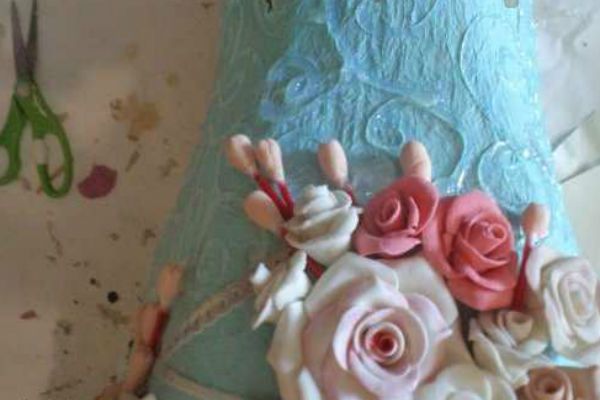
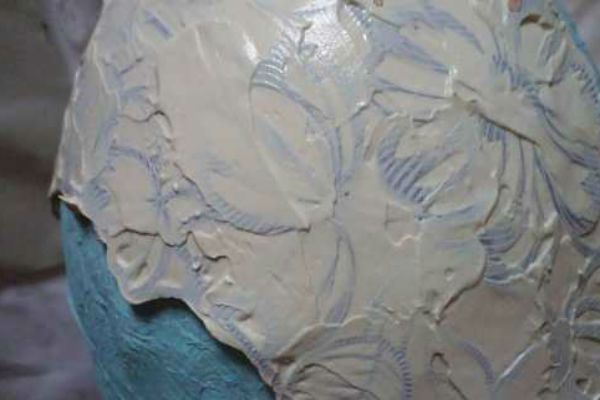
- Using a cured glue gun, apply the mark onto the vase.
- Glue decorative flowers to the vase.
- Use killed serverets and putty to create a voluminous baby.
Dry the putty and remove the template from the server and vase.
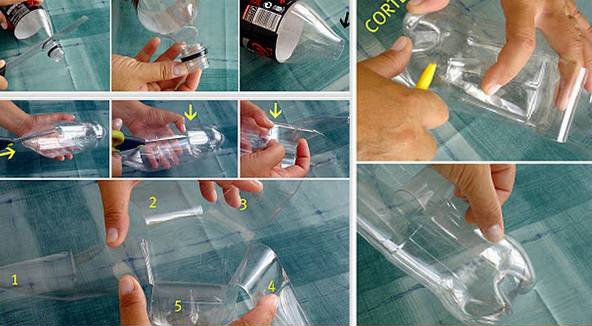
![]()
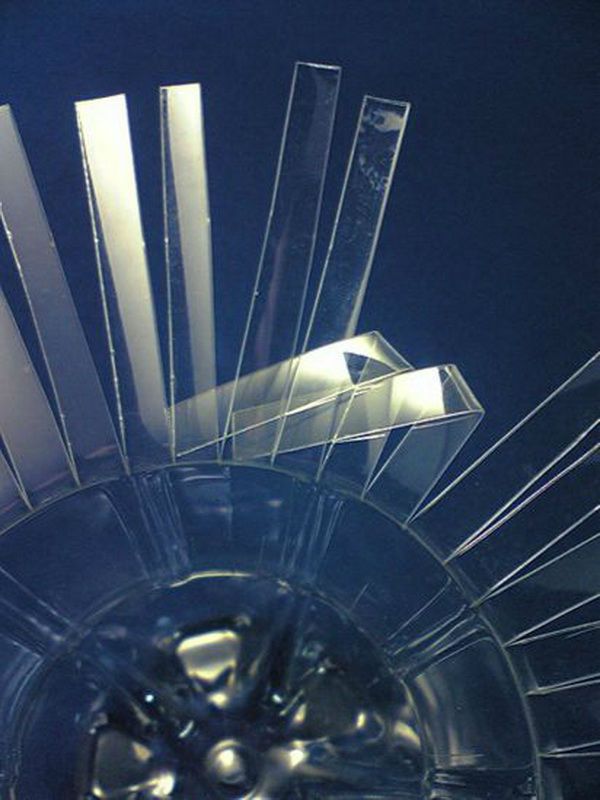
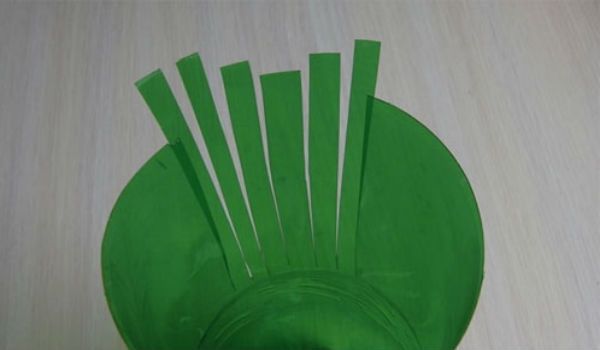
2. Along the upper edge of the dance, make vertical cuts on the same side, one type at a depth of 7.5 - 8 cm.

3. Carefully push the edges out.
 |
 |
To press the tops evenly, turn the dough over and press it to a flat surface (for example, to the table).
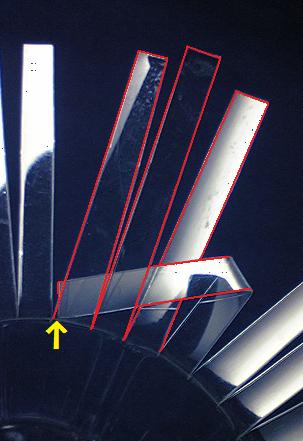
4. Now you need to “braid” the edge of the vase.
To do this, take one mixture, move it to the left and, having missed one mixture, tuck it under two others.
 |
 |
5. Also move the fold to the left, then skip two folds and tuck them under the third.
Repeat until you do not weave the edge, and all the edges will not be braided.
Visushiti.
- When making a vase, you can paint the vase in any color using acrylic paint or paint spray from a spray can.
- Master class No. 2
- plastic bowl with a volume of 2 liters;
pea grains, kvass and beans;
stationery knife, ruler, marker, hot-melt glue gun and a can of Farby.
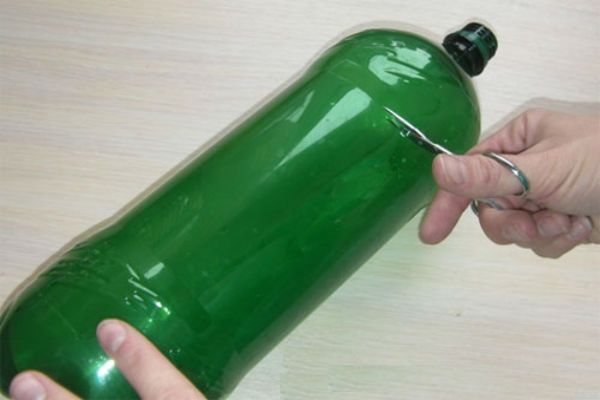
1. Beforehand, hold the neck of the dance at maximum height.
2. Using an additional marker, place vertical stitches from the cut to the bottom of the dance, placing them on the same side, one side at a time.

3. Using a hot-melt glue gun, glue the grains to the surface of the patch, spreading them out behind the previously glued lines.

Visushiti.
- 4. After this, coat the vase with a spray can and let it dry.
- DIY vase No. 3
- empty plastic bowl;
- 6-liter plastic water tank;
color papier;

olive glue; 1. Gently press and dry the plastic bowl, then determine the height of the vase. Shake your neck.

2. Take a paper of the color you would like to cover

internal bak Tear the vase into small pieces and glue them onto the inner surface of the vase. Continue chewing the glue until you cover the entire plastic surface with the paper.

3. Use a servet to wipe off excess glue and smooth the seams with your fingers so that the surface is more or less smooth.
4. Earn the same things from
external parties 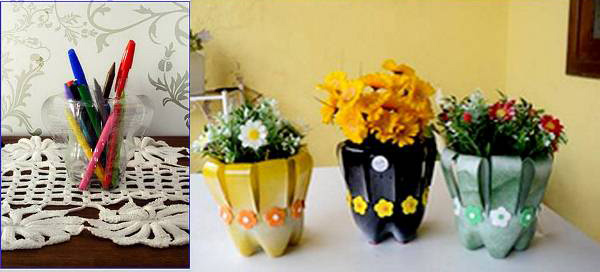
- Vazi, this time choosing papier in a contrasting color.
- 6-liter plastic water tank;
- Glue decorative flowers to the vase.
- Once the work is completed, keep the edges of the paper together to erase.
Lesson #4
You will need:
2 plastic dances;
glue or adhesive tape (for the basket).
A garnish of vases with squash will decorate the interior of the room, bringing a new brightness to the atmosphere.
You can buy a suitable vase in a store ready-made, or you can use all your creative potential and make a vase from a glass bowl yourself, using the ideas in this article. Viruses made with your own hands will always be especially precious and memorable. The stinks will not only serve as a wonderful element of interior decor, but also give warm positive emotions to the entire homeland day after day.
We already wrote about it, but now we’re amazed at what you can earn from curses. In order to understand garnish a vase
, you can vikoristuvat sklyana dance of any shape or color.
For example, the axis of the Master Class, for the help of which one hesitates, is as bright as the one in the third photo.
The vase can be made with a narrow neck, intended for one small pot, or at the stage of preparing the vase, cut the neck in advance.
How to earn money at home using improvised means will be discussed below.
In order to carefully prepare the dance neck, it is necessary to prepare
current materials
that items: Tovsta vovnyana thread; Retailer (you can also use acetone, gas, alcohol, gasoline);

Gloves and eyepieces with safety precautions;
Sirniki;
Cut the servettes into 4 parts, apply PVA glue to a small vase and carefully glue them through all the servets, in which case it is necessary to create special spots on the skin of the servets, where the beads and rhinestones will go.
Don't hesitate to use a cotton stick.
You need to place it in the center of the server and rotate it along its axis.

If the surface is covered in this way, it must be left to dry for 4 years.

Then you need to glue the threads with woven threads using PVA glue.
After drying, the vase is ready before applying the furbi from a spray can of a similar color.

When completed, after 45 minutes, you can decorate the vase with rhinestones, nasties, a stitch, vikory and insightful Moment glue.
A vase of cursed dances and a knitted cover.

This option will especially appeal to those who are able to get involved.
To implement this method, it is necessary to knit a fire cover for a future vase that matches the style and interior design of the room. Such vases create warmth and quiet in the booth. and texture (the appearance of musical instruments, cylinders, etc.). Therefore, as a product of waste, the rich simply cannot raise their hand to throw away such containers. So, by the way, you don’t need any work, and even if you have developed enough imagination, three ounces of terpene and a portion of zhusil, you can earn some money from them.
Let's talk about this, about how to make a vase from cursed dances.
Tse External method bring freshness to the interior of your cabin or apartment, and all materials for creativity are completely accessible.
Method No. 1: the simplest

The easiest way to turn a dance into a flower vase is to make a decorative cover for it.
Moreover, you can periodically change such a “coat” while dancing.
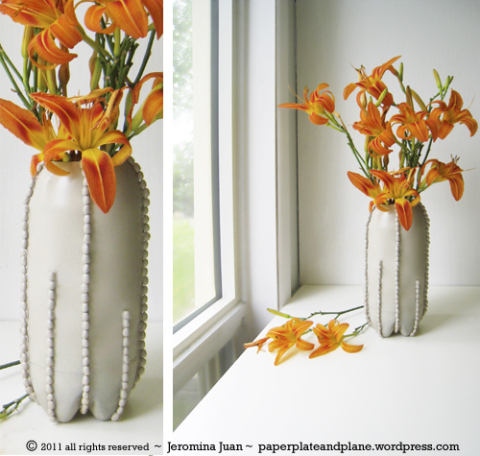
Method No. 3: pasting the dance with a motuzka
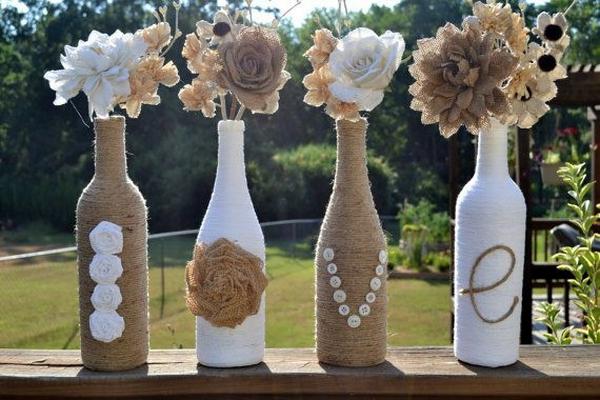
By using a little glue, cotton thread, a skein or a stitch, you can get an original vase from the dance. The master class in this diet is a completely simple and straightforward process. Frost the top of the dough first, then coat it with glue or use a special gun.
Next, carefully and without haste, twist the thread of the skein, starting from the very day.
Squeeze her tighter. You can glue the dance completely (as in the photo) or only partially. After drying, the surface can be decorated with additional decorative elements.
Remember the rule of thumb - guilty materials combine with each other (natural with natural).
So, up to a simple skein, it’s good to go to wood, knit, made from hide or simple burlap, other from waxing wax, etc.

This option requires a lot of skills and patience, leaving the robot to finish the job.
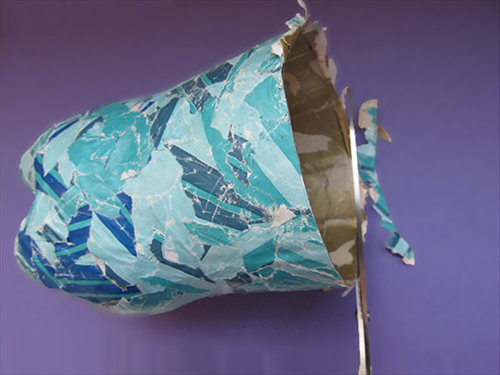
Decoupage, in essence, is the application of paper paper on any surface.
In addition to special pictures or taken from magazines, you will need glue, pencils and varnish for residual coating. You won't be able to get enough of the basics, but you'll be able to go through the first master class. Paintings using different decoupage techniques will require careful skimming of the surface, and then priming.
This can be done by carefully applying the image to the edge and carefully sealing it with glue (special or PVA).
Allow the surface to dry.
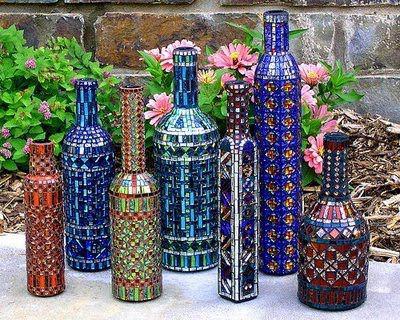
In fact, this method is very similar to mosaic, using other materials and slightly different technology.
You can cover the dance with anything you have on hand.
If you brought a whole package of turtles from their summer vacation to the sea, then you can easily create turtles from the dances, including vases, from their vicors.
- Do not be limited by one material, but create entire compositions.
- Together with the turtles, the first motuzka and sand look good.
From this day, what is on your skin, you can also create a garnet.
Try dormouse, watermelon, kava grains, buckwheat, etc.
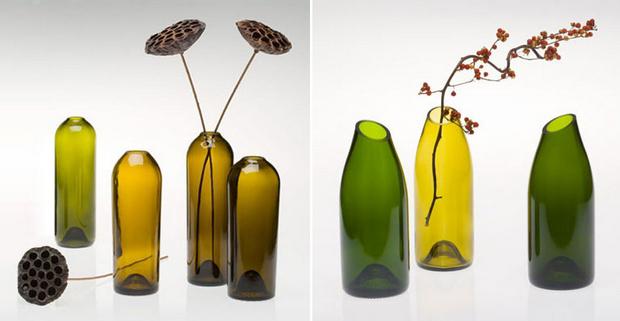
Method No. 8: trimming the dance The necklaces themselves have a practically ideal shape and color, so it’s easy to trim the neck – and the result is an extremely laconic and stylish vase. You can earn money in different ways:
cut off just the neck, for example, like in the photo of Evil;
cut the dance by 1/3 and half.
In both types of cuts, there may be fissures parallel to the surface or under the cut, which looks perfect.
With sufficient skills, it is possible to make a figure with the help of special equipment.
Where to go old dance why wine?

Vikoristuchi farbi and cigarette papier with a garniy baby, you can turn it into an original vase.
The process itself is simple, and you just need to get started with the decoupage process.
- Materials and tools
- Requirements: empty glass dances;;
- vidro
- hot water
- a cup of soda;
- alcohol;
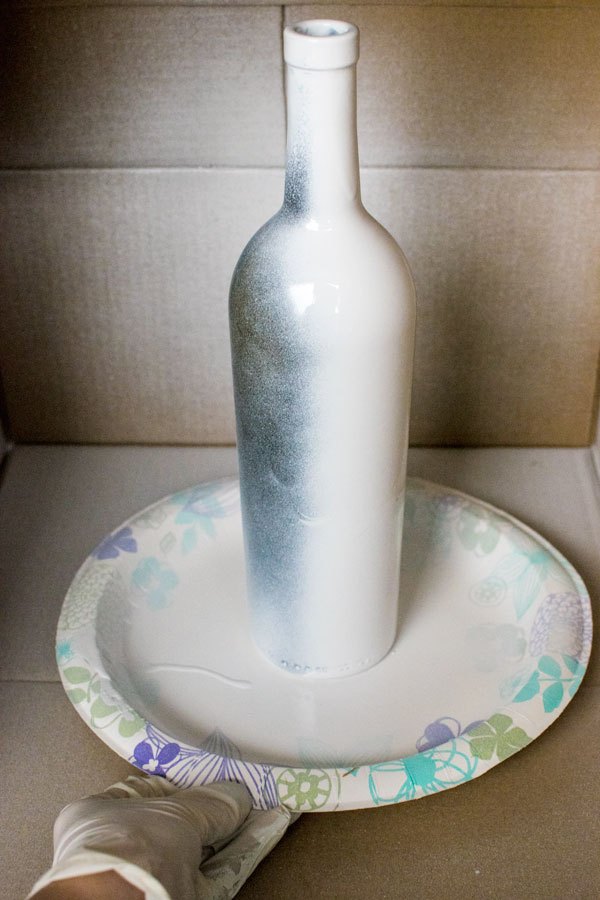
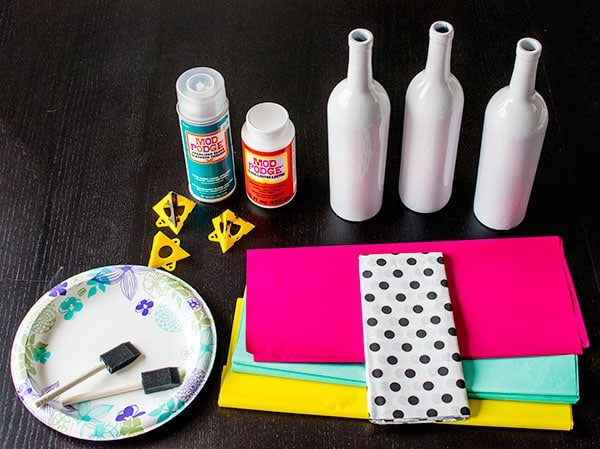
- a can of white enamel fabric;
- sponge brush;
- glue for decoupage;
mittens;
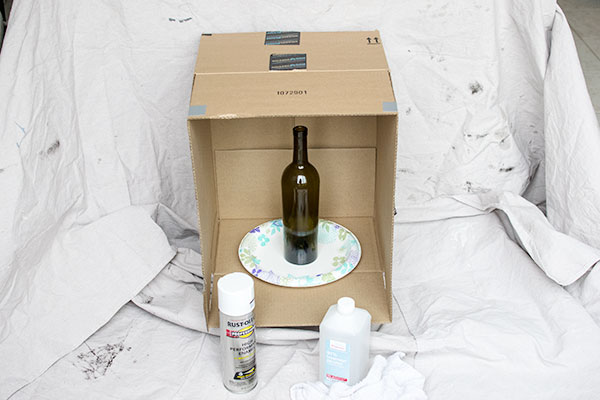
Cigarette paper in different colors. To avoid making the booths cluttered, create a special device for making dances with a spray can. It has a very simple design and consists of two parts: medium-sized boxes and disposable plates.
For
- additional zakhist On top you can take unnecessary plaster or newspapers to lay them there, as you work with the farbe. How to remove the label from dancing
- Disconnect from a glass of hot water and a cup of soda, put dances there.
- Take a drink so that the stench is filled with water.

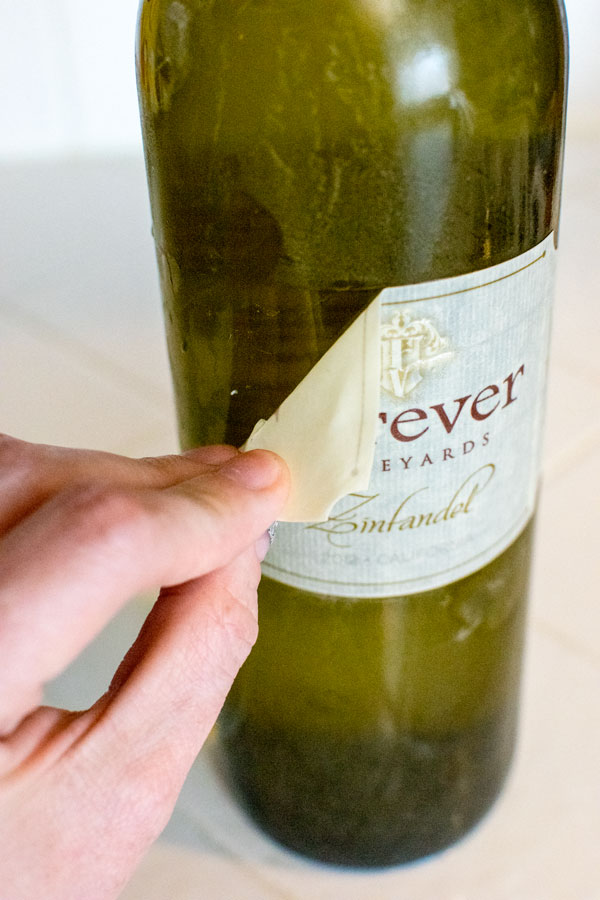

Otherwise, the stench will melt, and the label will not get wet in any place.
Leave the dishes aside for the evening.
- Through this process, remove the sticks and remove the smeared label and remove the glue from the walls.
- You can quickly get a ghost item
- , to scrape the clothes, it is important to go out.
- You may not be able to remove the label completely the first time, so place the balls back in the water again and try again. Now you need to thoroughly dry the cleaned container. Then wet the server with alcohol and wipe all surfaces of the plate.
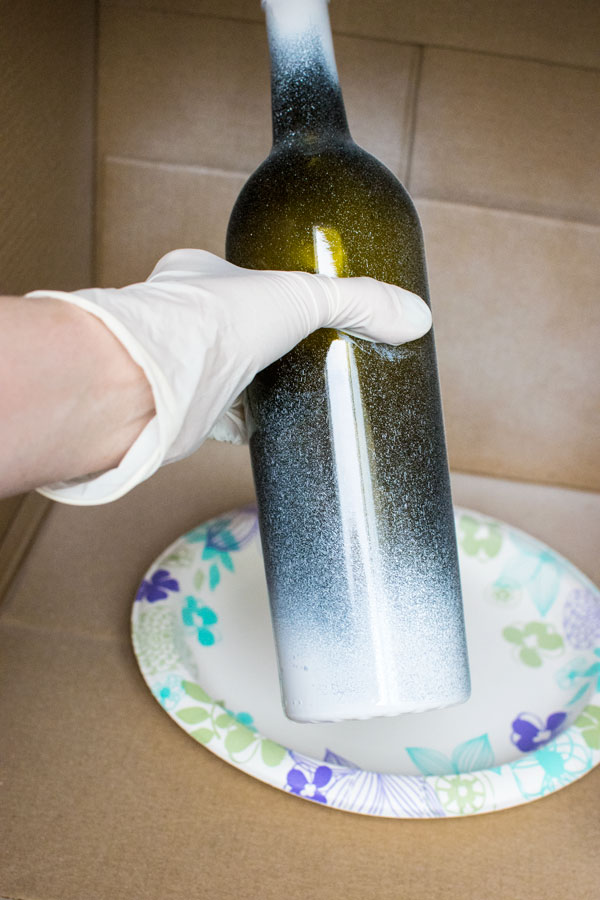
This crumb is necessary so that the farb lays more beautifully on the slope.
Everything that happened before, except preparation, and now the actual creative process of creating the vase begins.
- Tear the selected arctic paper into strips of different sizes and shapes.
- Apply them to the dance, try them on and marvel at how to stick them better.
- Before speaking, the paper can be glued and overlapped, this technique will help to achieve a nice effect that resembles watercolor painting.
- Select the piece you want to glue first.
- Using a sponge pen, apply a thin ball of decoupage glue to the part of the dance where you planned to glue the papier.
- Carefully place one edge of the paper to the crease and glue the entire piece of paper with soft strands.
- Apply yourself to smooth out your yoga.
- Turn over so that the edges of the surface of the dance fit snugly.
- As soon as they come out, apply a little more glue with a pencil and press down on the paper.

Now you need to cover the glued leaf with animal glue.
During the process, you will be able to smooth out all the wrinkles, as there is a stink.
In a similar way, glue all the other pieces of paper onto the paper, spreading them out the way you want.
At the final stage, you need to apply another ball of glue, then carefully use a servet, so as not to destroy or damage the paper, and remove any excess.
Let the dances dry.
Vikoristuchi farbi and cigarette papier with a garniy baby, you can turn it into an original vase.
Leave the drying time to the glue mark according to the instructions on the packaging.
- Behind the baskets you can use a top mother-of-pearl coating.
- It must be applied after the glue has dried.
- 6-liter plastic water tank;
- POINT No. 1: You need to be very careful with the paper - it is very thin and breaks easily.
- emery paper or a primer for stained surfaces.
Robot order
- The first part of the label needs to be cleaned - press it in the middle and remove any excess from the label.
- To make the process easier, you can soak the balls in hot soda water first until the papier gets wet.
- Then dry the cleaned container.
- Before you begin farbing, you need to prepare the surface so that the farb lies evenly on the surface and is gently pressed onto it.
- For this purpose, choose one of two options: sand the outer walls of the flap with an emery paper, or cover the surface of the flap from the neck to the bottom with a primer (it’s rare to use a primer, or varnish).
- While the dances are drying, cut knitted fabrics from black paper.
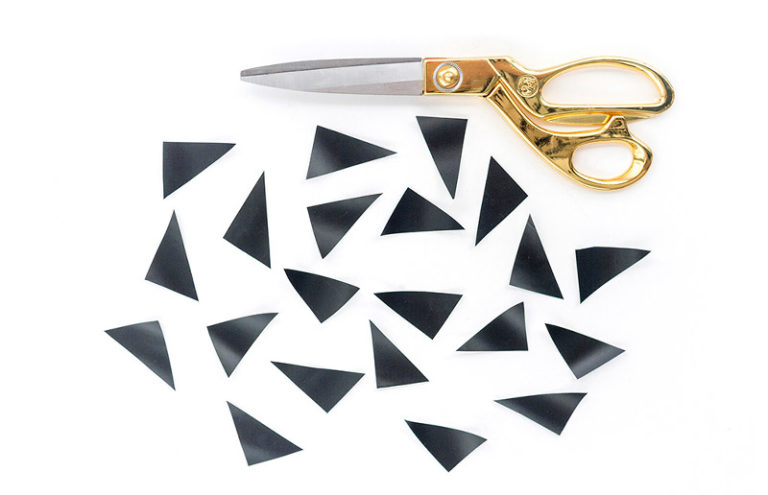


Their size and quantity depend on the size of the container you are decorating, and what kind of baby you plan to display.

However, all the trikutniks are still new.
The best way is to make one first, and then use it as a stencil for all future steps. Decorate how you want to decorate the dance..
After this, you can proceed to gluing the jerseys exactly as planned.

Vikoristuchi farbi and cigarette papier with a garniy baby, you can turn it into an original vase.
Attach the paper to the fold carefully so that it presses firmly to the surface and does not create a wrinkle.
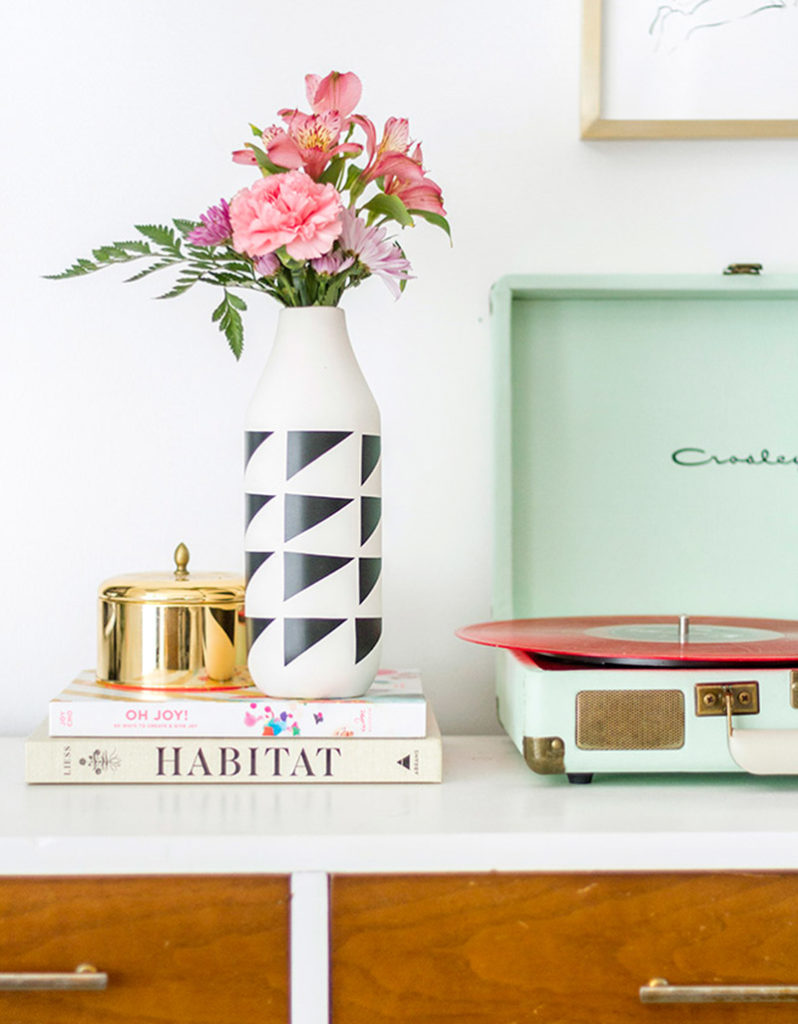
- The axis is all, the vib is ready.
- For the next dance, if you wanted to decorate the containers with trikulets, you can choose a different pattern for gluing decorative elements, and you can paint all the vases in the same style.
- Master class No. 3: Bookcase with dances
- You can breathe life into the vikorstan bottle dances, or bottles can be done without turning them into a vase.
- This master-class will help you figure out the wood, the dance and the farb of an unoriginal design -
- shelf with vases
- For future vases, it is important to find small little flowers - small bouquets or single flowers look especially impressive on them.
- You need to prepare:
Robot order
3 round wooden slats 7, 14 and 15 cm, ear diameter – 25 mm; 10 small garni-shaped dances; 3 round wooden boards with a diameter of 20, 23 and 25 cm;

- Place a board (23 cm in diameter) on this structure.
- Now in the places where the necks of the dances stick to the underside of the other board, make marks (trace the contours of the neck with an olive).
Take this board and place it on top with the other side, where the marks are broken up.

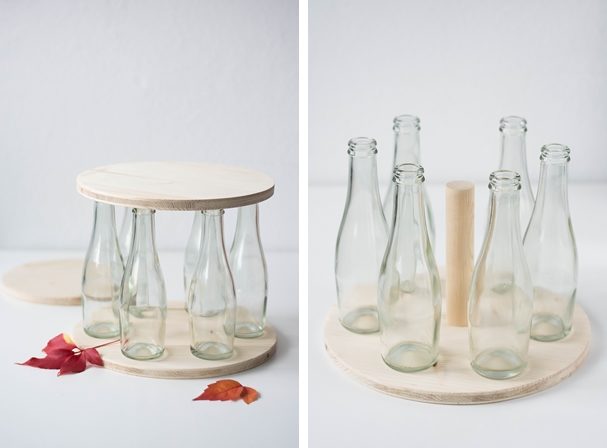
Drill at the designated places and open with the help of a circular file.
- The diameter of the openings will be much larger, lower at the necks, this is necessary in order to be able to easily grasp the bowls, change water in them, and wash them.
- Place this board on the dances so that their necks are flushed at the door.
- Now place on the other side the 4 dances that you have lost, while maintaining equal positions between them. Place the third doll on the animal.

Trace the contours of the dances on the bottom side, punch the opening. Take the structure apart and identify the center of all three planks. Glue round slats there.

For the largest dog, take
the rail for the first one is 15 cm, for the other - 14 cm, for the third - 7 cm.

Now you can make up the bookcase.
Visushiti.
- Behind the baskets you can use a top mother-of-pearl coating.
- For the shelf shown in the photo, the bulge of Vikoristan
- three different colors of gray farby
- .
- Once all the parts are dry, place the bowls on top of the water in the openings and place the pots in them.
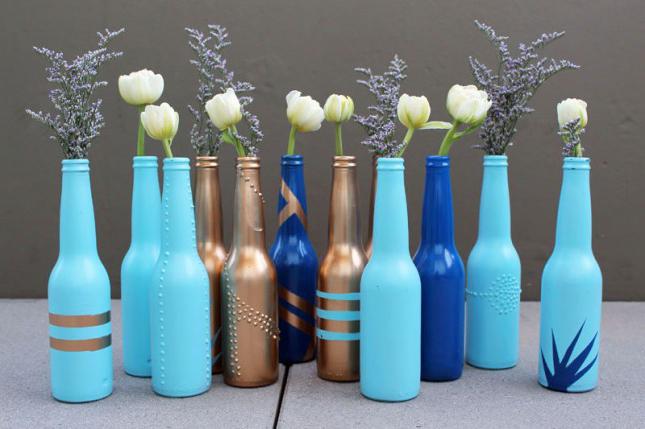
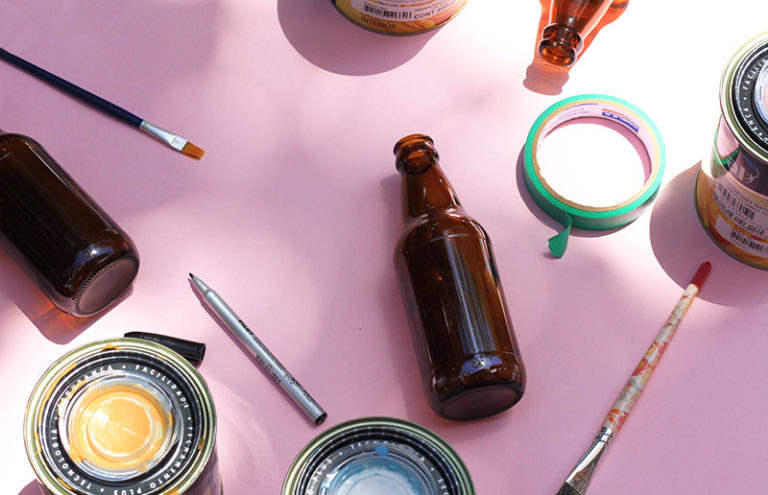
- Master class No. 4: Hand-painted dance
Robot order
- If you have accumulated a bunch of dances that need to be thrown away, you can transform them into a vase with a unique baby.
- To work, you don’t need to use aerosol sprays that smell strong, so you can use them at home. Tools and materials.
- acrylic fabric; brushes or kitchen sponge; adhesive stitch; pen for painting on stone;.
Primer for paint or emery paper.
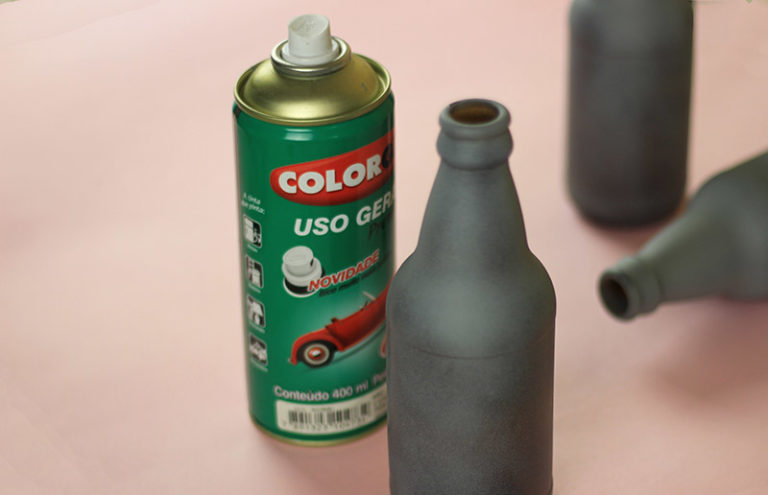
Carefully squeeze the flaps in the middle, remove the label from them, and hang them up.
The fragments are slippery – the material must be kept slimy; before applying the furbi, the surface must be prepared.
- Cover the walls with primer or
- Prepare the farb, separate the area behind the adhesive strip for any purpose (since the baby does not contain ashes, but is made up of various elements).


- It is best to prepare it with a foam sponge. For small plots, you can cut thin slices or speed up sponge penzlem
- .
- If you use a pencil on the slide, you may lose traces of strokes. Until the farb has dried, it may not look very smooth, the surface will lose traces of sponge, or after drying, all the shortness will disappear.
- First strokes after dipping the sponge
- For farb, it is necessary to apply it between the vegetable plots; fragments of farb can flow onto them. If the first ball is not enough to get a bright and even coating, apply another one..